Showing posts with label Crafts. Show all posts

Thursday, February 9, 2012

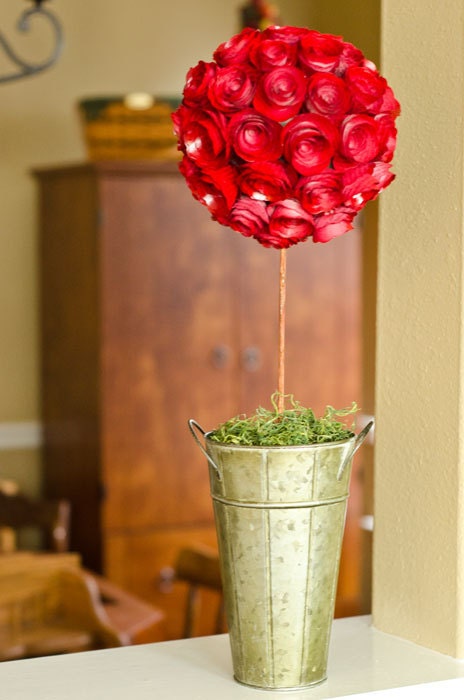
Project Pinterest - Crimson Red Book Page Rosette Topiary


I finally made it to the store for the necessary items to finish my topiary!
...and here it is...

Book Page Rosette Topiary in Crimson Red - Feminine and Romantic Table Decoration - Upcycled Home Decor

I am very happy with how this turned out! 
If you want this topiary without the fuss of making it {and the headache of making multiple trips to multiple stores...or maybe that's just my luck} you can buy this exact one in my shop, Anthology On Main.

If you're feelin' crafty, however...read on!
I had some leftover pages/rosettes from last week's book page wreath project {which already sold!}, saw a pin of a gorgeous pink topiary and knew those little rosettes were headed towards their destiny. 

But, I didn't want to keep them cream...they needed color. 
They needed red...a deep, dark red.

Do you want to know how I got them red?
Spray paint.
;)

I used a glossy red and gave them two coats.
I found that with the second coat they took on more of a leathery look, but I didn't want to completely abandon the coarseness of the book pages, so I stopped at two.
Red leather rosettes?
Awesomeness.


{ Inspiration Source & Tutorial: The Sweet Survival  |  Pinned via Amy P. }

{{ PS - I'm also working on a fabric wreath which I'll likely share next week. }}


Project Pinterest
1. Decide which pin on Pinterest you’d like to recreate.
2. Create it!
3. Flop or success, create a blog post about your re-do and include the original pin’s url.
4. Add the Project Pinterest button to your post so others can join in too!
5. Link up and check out other bloggers’ posts!


Thursday, February 2, 2012

Project Pinterest - Book Page Rosette Wreath


Sorry I'm a bit late with Project Pinterest this morning...Seth surprised us yesterday by coming home a full day early and PP had to take a backseat!

***

These gorgeous paper rosette wreaths are all. over. pinterest.
And they make me giddy every time I see them.
I happened to have some old-and-not-worth-reading books that were just begging to be repurposed into something beautiful...I was happy to oblige. ;)

{Tutorial Source: I'm A Yarner  |  Pinterest Source: Sara Harrison}

Wreath-on-Door

As the original tutorial states, this is very time consuming, but oh so worth it!
I took mine a step further and used decorative scissors to cut my book pages....it really made a big difference in the look of the rosettes.

Wreath-close-up

If you love this style but don't have the time to make it yourself, you can purchase this wreath in my new Etsy shop, Anthology on Main.


If you're planning to make one of these bad boys yourself, here are a few things I learned from this project that may help you...

Things I learned:
1. This project goes much faster if you cut multiple, stacked pages into spirals at one time.
2. If you use a straw wreath form you will want to wrap it in fabric to keep your home from looking like a barn.
3. Hot gluing a rosette directly to your finger will hurt. A lot.

hot-glue


Now it's your turn to show us what you've made!!
{Oooo! I can hardly wait!}


Project Pinterest
1. Decide which pin on Pinterest you’d like to recreate.
2. Create it!
3. Flop or success, create a blog post about your re-do and include the original pin’s url.
4. Add the Project Pinterest button to your post so others can join in too!
5. Link up and check out other bloggers’ posts!


Thursday, January 19, 2012

Project Pinterest - Yarn Alliums


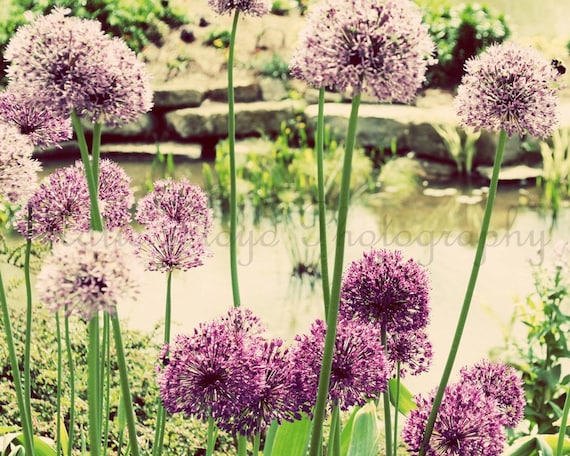
I love alliums...those big puffy floral balls that sit atop rather skinny stems.

Allium Garden - 8x10 Fine Art Flower Photography Print - purple and green vintage inspired flowering onion plant home decor photo


I'd love to have them line our mantle, but I have no interest in shelling out a small fortune to keep fresh ones in the house.


Enter: Alliums made from yarn!
They are so simple to make and I already had everything I needed on hand: yarn, glue, sticks.
01-18-12_0111

01-18-12_0161

The pom-pom tutorial calls for wool, but I didn't have any pretty wool that I was willing to waste on pom-poms, so I used regular acrylic yarn with sparkles...and I think it turned out just fine.


{Pom-Pom Flower Tutorial from PoppyTalk.blogspot.com | Pinned here}


Project Pinterest
1. Decide which pin on Pinterest you’d like to recreate.
2. Create it!
3. Flop or success, create a blog post about your re-do and include the original pin’s url.
4. Add the Project Pinterest button to your post so others can join in too!
5. Link up and check out other bloggers’ posts!


Saturday, October 9, 2010

Fall Craftiness

I finally made time for crafts!
And I decided on Fall decor rather than Halloween.
It won't scare the kids and I can leave it up through December without looking tacky.
 ;)

I've been wanting to make the following wreath for, oh, about a year!
No joke.
Here's the tutorial.
Although, I did mine a little different...if you know me, you know I use what I have on hand if at all possible!
I used my vine wreath (that I made myself) as my wreath form, rather than a wire one, but the same simple premise still applies.
wreath-1


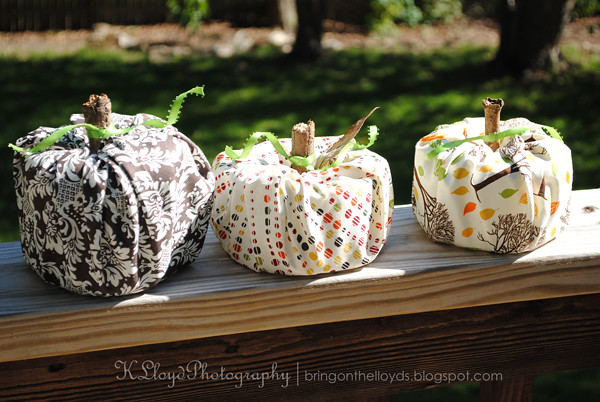
I also made some cute pumpkins!
Again, the tutorial is incredibly simple. And you can see it here.
And again, I did mine a little differently.
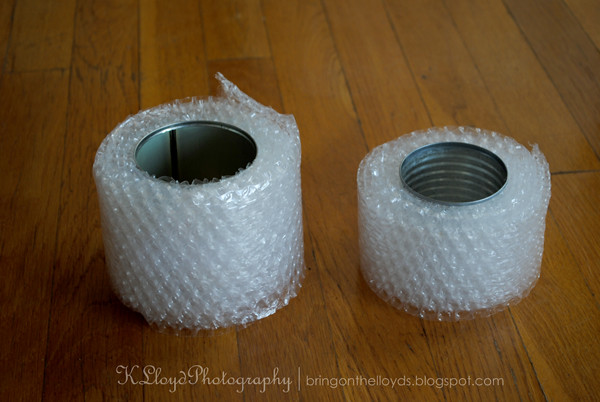
Instead of using toilet paper rolls as my base, I used tin cans from mushrooms and tomato sauce and wrapped them in bubble wrap!
We've had too many toilet paper emergencies recently for me to chance using some for crafts!
pumpkin-bases

I also took a little extra time and curled my ribbon so it looked a little more like pumpkin vines.
You can read how to do that here.
pumpkins

Monday, May 17, 2010

Things from the Craft Room: Fabric Flowers & Rose Cuff Bracelet

Fabric Flowers

The other morning I was browsing through my "craftiness" folder in my Google Reader.
I saw Jenny's post on fabric flowers (that's Jenny from The Southern Institute of Domestic Arts and Crafts) and immediately knew I had to make them!
The tutorial is here, at MADE, but you really should check out Jenny's idea of wrapping them in paper - sheer genius!

I made mine ever-so-slightly different.
First, I used floral stem wires because I had a bag on hand....not sure why I bought it in the first place, but it's been in my craft drawer since college.
(Good thing I'm one of those "I may need this someday, so I better move it with me where ever I go, even if that means over an entire decade" kinds of people, huh?!)
Second, I didn't do the felt thing.
It just didn't look right on mine.


~~~


Rose Cuff Bracelet

(Yes, that's a "pearl" necklace wrapped around my arm. As in the tutorial photos, this bracelet just looks better with a buddy!)
I saw this cute and girly accessory at Ruffles And Stuff. (via U create)
It is super simple to make, but oh so pretty!
Again, I slightly modified the original tutorial - mainly 'cause I broke the sewing machine I borrowed from my mom. Oops. And I was not about to hand stitch two pieces of felt together, so I just used one piece. Also, I did a lot less with the flower gluing process. I bought a small sprig of white flowers from the wedding section at Hobby Lobby, and all I had to do was snip off the flower heads and glue them onto the cuff - beads, layers and all! I did use a thorough amount of glue to help all those layers stay together, though.

Tuesday, May 4, 2010

Things from the Craft Room: Korker Bows & Tile Pendants

Korker Bows

After making some simple barrettes, I felt they needed a little somethin' and decided I'd try making korker bows!

You can see that tutorial here.

Note: I use clear nail polish instead of Fray Check.

***

Tile Pendant


I've been wanting to make these for about 2 years.
Last fall I found a Scrabble game at a garage sale for $1!
And this year, I finally got around to making them!

Here's the tutorial for these.

I made 10 - 1 went to my sister, 2 had air bubbles in the glaze and the 7 above are good, 6 just need the bails attached. I certainly don't need all of these so you may, at some point in the future, see a little listing for them on etsy or perhaps a fun giveaway here!

Another little note:
I couldn't find the Diamond Glaze that the tutorial says to use, so I found a thick glazing medium (below) and it works just the same, and it's $2 at JoAnn Fabrics. Less if you use a 40% off coupon. Oh, and where it says to brush it on, I just squirt on a thick layer and let it dry for a few days.
It levels itself out, but watch for bubbles!

Tuesday, April 27, 2010

Things from the Craft Room: Magazine Holder & Barrettes

Magazine Holder
made from a cereal box!


I used the smallest box size for this particular one, since the magazines are so little.
You can see the tutorial here.

~~~~~

Barrettes
I used mini alligator clips with teeth. I think they stay in place fabulously!
I got them from Hobby Lobby.


And my ribbon is 1/4" wide. It was a 4-pack from the Target Dollar Spot.
But most craft stores have ribbon on sale for 40% off or more all the time.


These were my very first barrettes:


They're ok and we'll use them,
but they don't look near as finished as my second attempt:

You can see the tutorial for these here.


...next up: korker bows and tile pendants!

Monday, April 19, 2010

My Craft Room

Part of the wonderfulness of our home, and part of the attraction I had to it when we were looking to buy a home, was this secret little room.
(The previous owner used it as an office.)


To get to it, you must go through the master bedroom, through the master bath, and through the walk-in closet.

And there, hidden in the closet, is the secret door to my special craft room.


It sat rather cluttered for...oh...8 months.
Yikes!
...and no, Rowan wasn't in there the whole time.


Today I have reclaimed it!!!


While it's not 100% organized, it is organized enough for me to finish one of the handful of in-process projects I have going at the moment.


I hope to share something crafty with you soon.
;)

Tuesday, March 16, 2010

Happy Birthday Decoration

Not long ago, I came across a tutorial on how to make a very neat Happy Birthday decoration.
(Update: I'm not sure why the link isn't working correctly, it's the right url and I've been having troubles getting to it from my bookmark, so I think it may be on their end. Sorry!)

We had a short piece of 4x4 in the garage and couldn't figure out what purpose it originally served, so I quickly confiscated it and put it to good use:

I made one side for Breck:


And one side for Rowan:


In hind sight, I should have sucked it up and bought big letters, rather than using what I had on hand, but oh well. We'll live.

I made the photo holders from 20 or 18 gauge wire that I've had sitting in a craft draw for years and used pliers to twist it.

I'm only about 80% happy with it, so I'm thinking of embellishing with birthday stickers and such things. Any ideas???

Friday, February 26, 2010

Crafty WIPs

Here are a few things I've been working on...

Easter Bunnies for the kids:
This was my first one; my test bunny. I think it turned out ok. So, now I'm in the process of making another bunny with somewhat fuzzy yarn. I'm hoping to get it done next week.


***

And I'm also working on a tote.
(there will be pockets all around the bag)


But, I'm kinda stuck right now because I'm out of yarn. I went to get more the other day and didn't take my yarn with me to match. And, well, I grabbed the wrong color. It's a shade lighter than what I need and JoAnn's apparently doesn't carry the color I'm using.
Boo.
So, eventually I'll make my way to Hobby Lobby. And hope to goodness they carry what I need!
When it's all crocheted, I'll line it with some funky fabric!

Maybe this


Eventually, it will replace my ugly bag 'o bags that I haul around with me on errands.
Sometimes a girl just wants to be stylish while being frugal!

***

And I've got a few other things in queue:
  1. Placemat kind of thing for Breck's dresser top
  2. Cardigan - just need to get the right hook size
  3. Ripple blanket - full size - for Breck
  4. Hexagon blanket - full size - for Rowan

Tuesday, January 19, 2010

What I'm Working On...

I'm working on two blankets and several preemie and newborn hats for a friend of ours who works in a local NICU. I told her of these blankets and hats in mid-November, but the holidays turned out a little busier than anticipated and I had no motivation to crochet when the hustle and bustle was over.

But, it's time to get off my backside and get these finished! So, I'm working on them this week.

The blanket below is a simple checker board pattern, and I will not do it again. I hate sewing blocks together and that's how this one's assembled. I have 8 more blocks to crochet, sew them together and then sew in all the loose ends.

Do you have any tips for sewing them together? What kind of stitch do you find works best?


This next one is the first one I made - if you've been around here, you may remember seeing this one. I love it! The ripple is really smooth and flowing and the colors are much brighter than your typical baby pastels.

I've also finished 2 preemie hats. I knew these would be small, but they are sooo tiny! It's hard to imagine a real live baby can wear these. I'm planning to make a couple more in bigger sizes.


ETA: I totally forgot to include the links to these patterns. Bad blogger.

Block blanket
Ripple blanket
itty-bitty hats

***

And this last one has nothing to do with babies.

It's the pencil drawing for Breck's dinosaur painting. It's not really this dark - I super-boosted the shadows so you could see it a bit better. I'm trying to draw a pterodactyl, but am having some issues with perspective...

Once I get that drawn, I'll move onto painting - yikes!


Thursday, January 14, 2010

Ornament Wreath


Around Christmas, I saw the original wreath tutorial at Eddie Ross and knew that I simply must have one of my own!
(...but not until all those ornaments went on clearance!)

So, about a week to ten days after Christmas, I headed to the stores in search of some deeply discounted, round ornaments. And I scored the jackpot at Super Target. All Christmas decor was 75% off and they had quite a few tubes of ten coordinating ornaments, originally priced at $5.00, but now clearanced to $1.25! So I bought 5 tubes...equaling 50 ornaments and a total of $6.25!
(the original project recommends about 80, but I was able to get by with 50.)


When I got home, I searched for a wire hanger - and found one.
(I hate the awful things and gave away all of ours last year...save one.)
So, wire hanger in hand, I got to stringing those lovely ornaments.
Be sure to glue those tops on, even if they seem like they won't fall off - they will and it's a pain to get them back on.

Ornaments strung, I then waited for ribbon to be on (a good) sale - and this week at Hobby Lobby it's 50% off! So, I watched a few video tutorials on how to make a ribbon bow, then just did my own thing (because I'm physically incapable of following directions) and it turned out pretty good.
I ended up sewing my little bunch of ribbon together - most tuts I saw said to just tie securely with a twist tie - what they don't tell you is that all the folds in the middle will pop out!!
A handful of attempts later, I had a bow that was good enough!
Oh, and the ribbon I got was wire edged.

Not to be braggy, but I think it turned pretty awesome!

Thursday, January 7, 2010

Three Paintings for Rowan's Room

I finished the three paintings for Rowan's room!
Surprisingly, it didn't take as long as I thought it would.


My favorite is the left, which is the last one I did. I'm really disappointed with the middle one - it didn't turn out how it was in my head and I'm not sure how to fix it yet. And I'm satisfied with the right one, which was the first of the three - nothing spectacular, but not terrible. ;)

I based these on the name letters I made for Rowan last year:


...now I have to start on Breck's dinosaur painting...before he nags me to death! ;)
He's excited, I'm nervous - I'm not known for being able to draw animals or people very well!

Monday, December 21, 2009

"The Project" Project

There are millions of super cool crafts I keep finding. And I want to do them. All of them. But, I'm slow at crafting. Really sllloooooooowwww. I read slowly, I crochet and knit slowly, don't even ask me how long it takes to complete one scrapbook page!! So, I've decided to compile all the awesome crafts I find, because this blog is my journal of all things. And I can't lose it. (well, I could, but let's think happy thoughts.) I lose paper lists like you wouldn't believe. And bookmarks don't work for me either. We have two computers and then I can't remember where I saved a particular project link and/or it gets buried and forgotten.

So, I'm making a list...and I'll be checking it twice, and thrice, and so on...and adding to it as I find more awesomely cool things to make. I'll mark off the crafts as I do them. (and I'll add a link to my finished product, because you know there will be a post about it!)

There's a link to The Project Project in "The Basement"...as a reminder to myself and just in case you'd like to check in from time to time to see what I've found.

Happy crafting!
:D


*****


"The Project" Project Master List
(a work in progress...and in no particular order)


8-Pocket Tote
(by Lion Brand)


Skeleton from milk jugs
(photo from AHC, directions from FamilyFun)


*(no picture) Curtain tie backs for Rowan's room


*(no picture) Valance in brown & white stripes for the office


*(no picture) Dinosaur painting for Breck's room - at his request - we'll see how this one turns out!


*(no picture) Monster plushies


*(no picture) Scrapbooking - I'd like to catch up on at least 1 full year! (I have about 3 years waiting in a box)


*(no picture) Shrunken dress rehab - I have a minimum of 2 dresses that I've shrunken and the fabric is too cute to throw them out, but I have no idea what I'll use them for...ideas are welcome!


*(no picture) Stretch the canvas prints I bought months ago.
...more to come...

*****

Finished Projects!

Three paintings for Rowan's room


Ornament Wreath

LinkWithin

Related Posts with Thumbnails