

computer
printer
paper (used or junk mail is perfect)
scissors
X-Acto knife
8 1/2 x 11 scrapbook paper in your choice of patterns - 1 sheet per letter (Hobby Lobby often has their paper at 50% off, making this size sheet about $0.15 a piece - or you could even use magazine or catalog pages!)
cardboard (I used a FedEx box - it worked great!)
marker/pen/pencil
spray adhesive
ribbon
Directions
Step 1. Choose a font/letter template.
If you aren't happy with your computer's current fonts, there are a lot of good ones at 1001FreeFonts.com. It's a lot easier to cut out the letters in cardboard, as well as quicker, if you choose a block-style font. For Breck's name I used Basic Font. or Rowan's I used Swing Time.
(Here's a how-to on downloading fonts on your computer for Windows XP.)
Now that you've chosen a font and have it on your computer, open a Word document. (or an equivalent program) Select the font from your font list and type the name. You'll want the letters to be as close to your paper size as you can get (ie: one letter per page), so you'll need to play around with the font size and margins (under file, page setup) to see what works. As a general guide, I used a 600 point font for Breck's name and a 750 point for Rowan's and made my margins as narrow as I could.
Step 3. Print the names.
(I printed mine on used paper since these will just be our template letters.)

Step 4. Cut out the letters.
(Depending on the letters used, you may need an X-Acto knife in addition to scissors.)

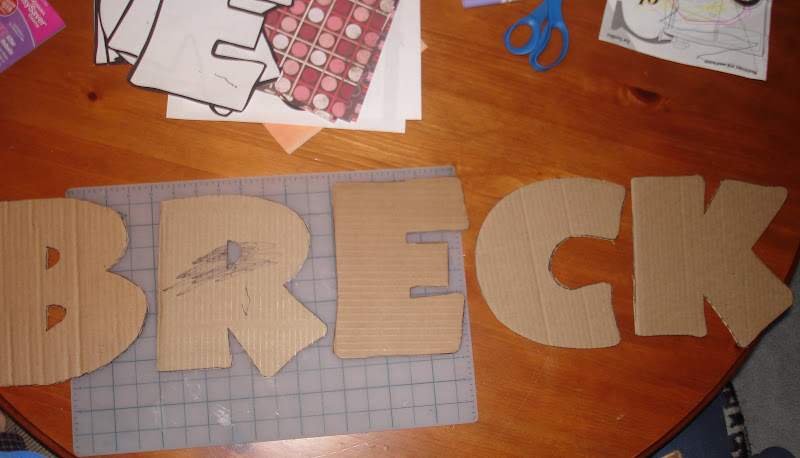
Step 5. Trace the letters onto cardboard and cut out.
Step 6. Trace the cardboard letters onto scrapbook paper and cut out.
Use a pen/pencil for this step. I traced my letters on the backside of the paper, so when/if I made a mistake, it wouldn't matter. If you do this be sure to reverse the letters so they come out facing the right way on the patterned side of the paper!
(Note: If you use the paper template for this step, your scrapbook paper letters will end up being smaller than your cardboard letters.)

Step 7. Measure and cut your ribbon.
(For Breck's I used 2 strips cut to 18 inches each. For Rowan's I left my length of ribbon (it varied from 24 inches to 36 inches) attached to the roll and used the "bunny ears" method to tie the bows. This makes the bows prettier, but the two-strip method makes the letters lay against the wall better.)


Take your ribbons and cardboard letters to a well ventilated place (the garage for me) and spray about 1-2" of the ribbon ends with spray adhesive, then attach to the back of the cardboard letters. You'll want to put down newspaper (or something) under your work area, as the spray glue does make a mess. Let dry for about an hour.


Step 8. Apply the scrapbook letters to the cardboard.
(Ooooo, we're sooooo close to being finished!)
Now take your scrapbook paper and cardboard letters to the well ventilated place and spray the back of the scrapbook letters with spray adhesive, then line up and apply to the cardboard letters. Smooth out any bubbles with your hand. Let dry for at least an hour.

Step 9. Time to hang your lovely letters!
(If you used two strips of ribbons, now's the time to tie a bow on each letter.) To secure to the wall, I used one nail for each of my letters and simply hung the ribbons over the nails. Since the letters are very light weight, you could probably use double sided tape.
Oh my I LOVE these!! They look great!
ReplyDeleteKatie-Those are really cute! I have some wooden letters that I tried to paint for the girls hairbow holders, I think I just might cover them with paper instead! :) I think I will need modge podge though to get it to stick. . .I'll let you know!
ReplyDeleteStopping by from SITS-- I tried to comment on your newest post, but the comments button wasn't working...
ReplyDeleteAnyway, I LOVE this craft idea. I think I might try to copy it. Thank you so much for sharing your step by step instructions!
~Elizabeth
http://confessionsfromaworkingmom.blogspot.com
Dropping in from SITS!
ReplyDeleteThese are adorable! Such a great idea, and a lot cheaper then buying and decorating those wooden letters. Thanks for posting!
--Brittany Ciara
brittanyciara.blogspot.com